QuickBooks Database Server Manager (Installing & Updating)
- alexnelson030722
- Jan 2, 2023
- 3 min read


QuickBooks services and databases have significantly impacted the accounting and financial industries. Today, most businesses create invoices above anything else, which helps small businesses run honestly. One fantastic feature of QuickBooks is how simple and hassle-free anyone can use its UI.
Multiple users can access QuickBooks Server. This database manager utility generates a network data file for every specified company file on the local host system (.ND). Today, we'll discuss QuickBooks Database Server Manager.

How should the QuickBooks database server manager be configured?
We will discuss the procedures needed to use the tool in this part. In addition, the process for setting up will also be addressed.
The firewall needs to be manually configured first. This will enable the server to run the utility.
The "port monitor" tab can be accessed by opening the database.

3. Select the “Windows Firewall” tab after selecting Start.

4. Go to the inbound rule under advanced settings. Then select "rule."

5. Select the port, then press next.
6. Make sure the TCP and specified local ports option is chosen.

7. Then click next and "enable the connection."
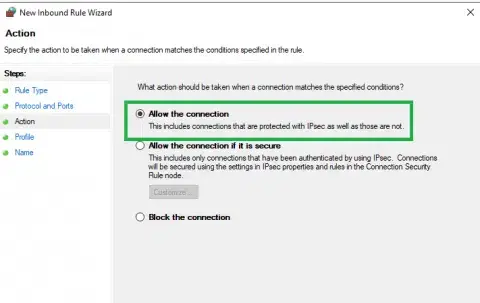
8. Select "Next" after marking each profile.
9. After making your rule, click the finish button.
The manager of your QuickBooks database server is now configured. The scanned folders will automatically perform a full scan of all the firm files intended for multi-user access.
Monitored Drive Features
Whenever you add new company files to the server, you may use the Monitored Drive functionality to keep your QuickBooks Database Server Manager up to date.
Select Program after pressing the Start button. Following that, click QuickBooks Database Manager.
Go to the Monitored Drive tab.

If you want to monitor all local discs for newly added company files, rename and remove them first, and then make your choice.
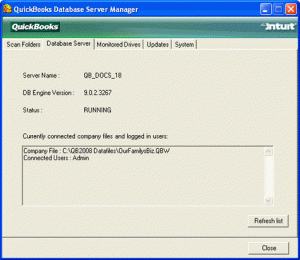
Database Server Features
Open your QB Database Server Manager and decide
List the company files connected to the server, together with the users logged into each company file.
The status will be shown on the QuickBooks Database Server's services. For example, when hosting firm files on the server, all services would be active.
If you wish to modify the status of the services in this situation, utilize the Services Administrative Tool to fix the services QBDBXX.
Update Features

Before downloading any upgrades, utilise the new features and verify the QuickBooks Server versions.
First, press the Start button and select Program immediately.
Press the QuickBooks Database Manager button now.
Click Updates.
You can install the updates by adhering to the on-screen directions.

To begin, click the Start button.
Choose the Program now.
Select the QuickBooks Database Manager menu item, then click System.
Check the computer's system details to see if the database server is installed there.
Installing QuickBooks database server manager instructions
To start installing the "Wizard," first double-click on the installer.
You can check to see if your computer has an active internet connection. Click next after pressing yes or no appropriately.
After that, hit next while your computer's open programs are still closed.
After reading the next page's terms and conditions, please check the box to accept them.
Then click next
You must now decide between "Custom or Network options" before selecting the installation style.
You can select not to be the host computer once finished.
The choices you'll have are "I will not be using QuickBooks on this computer," "I'll be using QuickBooks on this computer," and "I'll be using QuickBooks on this computer and saving."
After making an informed decision, grant access.
You will then be prompted for your product key and licence number.
Continually proceed according to the installation process's next steps.
Update QuickBooks database server manager instructions
You must download the patch first.
All that's left to do is restart the server after you're finished. Although most people ignore it, it is a crucial step.
On each workstation where the server is installed, this will update the server. After that is finished, a message stating, "Company File requires an update to work with this version of QuickBooks Desktop" should appear.
The modifications will also alter the database structure, as you will see next.
A message requesting you to generate a backup will now appear.
The tool's suggested next steps should be followed.
Check if each user can access your files.
Conclusion
That's all. We are aware that all procedures may be challenging. Setting up, installing, and updating QuickBooks' database server management is even more difficult. Nevertheless, it is worthwhile because it dramatically benefits enterprises. We hope this manual was practical.
If you face any father issues you should contact our QuickBooks support team at +1800-615-2347 for help.


Comments